Android -Dialogサンプル-
Dialog種類
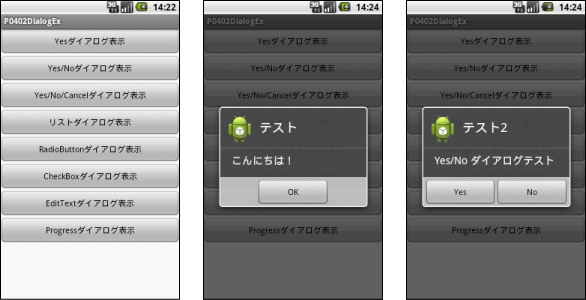
- 単一ボタンの確認ダイアログ
- Yes/Noダイアログ
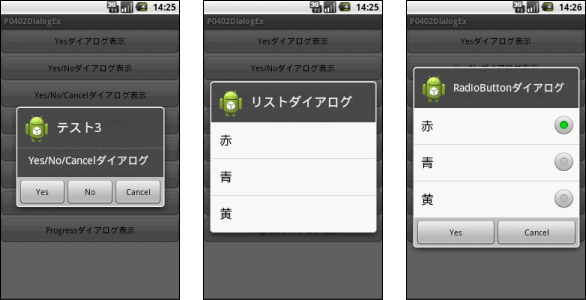
- Yes/No/Cancelのあるダイアログ
- リストダイアログ
- ラジオボタンダイアログ
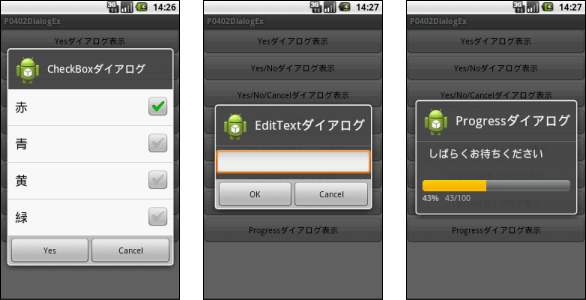
- チェックボックスダイアログ
- エディットテキストのダイアログ
- プログレスのダイアログ
Dialogサンプル
res/values/string.xml
<?xml version="1.0" encoding="utf-8"?>
<resources>
    <string name="hello">Hello World, P0402DialogEx!</string>
    <string name="app_name">P0402DialogEx</string>
    <string name="btn1_dialog">Yesダイアログ表示</string>
    <string name="btn2_dialog">Yes/Noダイアログ表示</string>
    <string name="btn3_dialog">Yes/No/Cancelダイアログ表示</string>
    <string name="btn4_dialog">リストダイアログ表示</string>
    <string name="btn5_dialog">RadioButtonダイアログ表示</string>
    <string name="btn6_dialog">CheckBoxダイアログ表示</string>
    <string name="btn7_dialog">EditTextダイアログ表示</string>
    <string name="btn8_dialog">Progressダイアログ表示</string>
</resources>
res/layout/main.xml
<?xml version="1.0" encoding="utf-8"?>
<LinearLayout xmlns:android="http://schemas.android.com/apk/res/android"
    android:layout_width="fill_parent"
    android:layout_height="fill_parent"
    android:orientation="vertical"
    android:background="#ffffff">

    <Button
        android:id="@+id/btn1_id"
        android:layout_width="fill_parent"
        android:layout_height="wrap_content"
        android:text="@string/btn1_dialog"/>

    <Button
        android:id="@+id/btn2_id"
        android:layout_width="fill_parent"
        android:layout_height="wrap_content"
        android:text="@string/btn2_dialog"/>

    <Button
        android:id="@+id/btn3_id"
        android:layout_width="fill_parent"
        android:layout_height="wrap_content"
        android:text="@string/btn3_dialog"/>

    <Button
        android:id="@+id/btn4_id"
        android:layout_width="fill_parent"
        android:layout_height="wrap_content"
        android:text="@string/btn4_dialog"/>

    <Button
        android:id="@+id/btn5_id"
        android:layout_width="fill_parent"
        android:layout_height="wrap_content"
        android:text="@string/btn5_dialog"/>

    <Button
        android:id="@+id/btn6_id"
        android:layout_width="fill_parent"
        android:layout_height="wrap_content"
        android:text="@string/btn6_dialog"/>

    <Button
        android:id="@+id/btn7_id"
        android:layout_width="fill_parent"
        android:layout_height="wrap_content"
        android:text="@string/btn7_dialog"/>

    <Button
        android:id="@+id/btn8_id"
        android:layout_width="fill_parent"
        android:layout_height="wrap_content"
        android:text="@string/btn8_dialog"/>
</LinearLayout>
P0402DialogEx.java
import android.app.Activity;
import android.app.AlertDialog;
import android.app.ProgressDialog;
import android.content.DialogInterface;
import android.os.Bundle;
import android.util.Log;
import android.view.View;
import android.view.View.OnClickListener;
import android.widget.Button;
import android.widget.EditText;
import android.widget.Toast;

public class P0402DialogEx extends Activity implements OnClickListener {

  static final int[] BUTTONS = { R.id.btn1_id, R.id.btn2_id, R.id.btn3_id,
      R.id.btn4_id, R.id.btn5_id, R.id.btn6_id, R.id.btn7_id,
      R.id.btn8_id };

  @Override
  public void onCreate(Bundle savedInstanceState) {
    super.onCreate(savedInstanceState);
    setContentView(R.layout.main);

    // ボタンの登録
    for (int btnId : BUTTONS) {
      Button btn = (Button) findViewById(btnId);
      btn.setOnClickListener(this);
    }
  }

  @Override
  public void onClick(View v) {
    switch (v.getId()) {
    case R.id.btn1_id:
      showDialog1();
      break;
    case R.id.btn2_id:
      showDialog2();
      break;
    case R.id.btn3_id:
      showDialog3();
      break;
    case R.id.btn4_id:
      showDialog4();
      break;
    case R.id.btn5_id:
      showDialog5();
      break;
    case R.id.btn6_id:
      showDialog6();
      break;
    case R.id.btn7_id:
      showDialog7();
      break;
    case R.id.btn8_id:
      showDialog8();
      break;

    }
  }

  // ////////単一ボタンのみのダイアログ ///////////
  private void showDialog1() {

    // AlertDialog.Builderオブジェクト生成
    AlertDialog.Builder ad = new AlertDialog.Builder(this);

    // タイトル指定
    ad.setTitle("テスト");

    // メッセージ指定
    ad.setMessage("こんにちは!");

    // アイコン指定
    ad.setIcon(R.drawable.ic_launcher);

    // 肯定的な意味を持つボタンを設定
    ad.setPositiveButton("OK", null);

    // ダイアログの表示
    ad.show();
  }

  // //////// Yes/NOダイアログ //////////
  private void showDialog2() {

    // AlertDialog.Builderオブジェクト生成
    AlertDialog.Builder ad = new AlertDialog.Builder(this);

    // タイトル指定
    ad.setTitle("テスト2");

    // メッセージ指定
    ad.setMessage("Yes/No ダイアログテスト");

    // アイコン指定
    ad.setIcon(R.drawable.ic_launcher);

    // 肯定的な意味を持つボタンを設定
    ad.setPositiveButton("Yes", new DialogInterface.OnClickListener() {
      @Override
      public void onClick(DialogInterface dialog, int which) {

        // PositiveButton押下時の処理を記述します。

        // 今回はトーストを表示してみます。
        Toast.makeText(P0402DialogEx.this, "Yesが押されました。",
            Toast.LENGTH_SHORT).show();
      }
    });

    // 否定的な意味を持つボタンを設定
    ad.setNegativeButton("No", new DialogInterface.OnClickListener() {
      @Override
      public void onClick(DialogInterface dialog, int which) {

        // NegativeButton押下時の処理を記述します。

        // 今回はトーストを表示してみます。
        Toast.makeText(P0402DialogEx.this, "Noが押されました。",
            Toast.LENGTH_SHORT).show();
      }
    });

    // ダイアログの表示
    ad.show();

  }

  // ////// Yes/No/Cancelのあるダイアログ //////////
  private void showDialog3() {

    // AlertDialog.Builderオブジェクト生成
    AlertDialog.Builder ad = new AlertDialog.Builder(this);

    // タイトル指定
    ad.setTitle("テスト3");

    // メッセージ指定
    ad.setMessage("Yes/No/Cancelダイアログ");

    // アイコン指定
    ad.setIcon(R.drawable.ic_launcher);

    // 肯定的な意味を持つボタンを設定
    ad.setPositiveButton("Yes", new DialogInterface.OnClickListener() {
      @Override
      public void onClick(DialogInterface dialog, int which) {

        // PositiveButton押下時の処理を記述します。

        // 今回はトーストを表示してみます。
        Toast.makeText(P0402DialogEx.this, "Yesが押されました。",
            Toast.LENGTH_SHORT).show();

      }
    });

    // 中立的な意味を持つボタンを設定
    ad.setNeutralButton("No", new DialogInterface.OnClickListener() {
      @Override
      public void onClick(DialogInterface dialog, int which) {

        // NeutralButton押下時の処理を記述します。

        // 今回はトーストを表示してみます。
        Toast.makeText(P0402DialogEx.this, "Noが押されました。",
            Toast.LENGTH_SHORT).show();
      }
    });

    // 否定的な意味を持つボタンを設定
    ad.setNegativeButton("Cancel", new DialogInterface.OnClickListener() {
      @Override
      public void onClick(DialogInterface dialog, int which) {

        // NegativeButton押下時の処理を記述します。

        // 今回はトーストを表示してみます。
        Toast.makeText(P0402DialogEx.this, "Cancelが押されました。",
            Toast.LENGTH_SHORT).show();
      }
    });

    // ダイアログの表示
    ad.show();

  }

  // //////// リストダイアログ //////////
  // リストの要素指定
  private String[] items = new String[] { "赤", "青", "黄" };

  private void showDialog4() {

    // AlertDialog.Builderオブジェクト生成
    AlertDialog.Builder ad = new AlertDialog.Builder(this);

    // タイトル指定
    ad.setTitle("リストダイアログ");

    // アイコン指定
    ad.setIcon(R.drawable.ic_launcher);

    // リスト内のアイテムを指定
    ad.setItems(items, new DialogInterface.OnClickListener() {
      @Override
      public void onClick(DialogInterface dialog, int which) {

        // リスト選択時の処理を記述します。

        // 今回はトーストを表示してみます。
        // whichでどの位置が選択されたかのインデックを取得することができます。
        Toast.makeText(P0402DialogEx.this, items[which] + "を選択",
            Toast.LENGTH_SHORT).show();
      }
    });

    // ダイアログの表示
    ad.show();
  }

  // //////// ラジオボタンダイアログ //////////
  // 要素の指定
  private String[] items2 = new String[] { "赤", "青", "黄" };
  // 選択状態の要素の位置
  private int default_num = 0;
  // 要素の値
  private String result_item;

  private void showDialog5() {

    // AlertDialog.Builderオブジェクト生成
    AlertDialog.Builder ad = new AlertDialog.Builder(this);

    // タイトル指定
    ad.setTitle("RadioButtonダイアログ");

    // アイコン指定
    ad.setIcon(R.drawable.ic_launcher);

    // 単一選択アイテムのリスト状態を管理
    ad.setSingleChoiceItems(items2, default_num,
        new DialogInterface.OnClickListener() {
          @Override
          public void onClick(DialogInterface dialog, int which) {
            // タップされた位置(which)で要素の値を取得
            result_item = items2[which];
          }
        });

    // 肯定的な意味を持つボタンを設定
    ad.setPositiveButton("Yes", new DialogInterface.OnClickListener() {
      @Override
      public void onClick(DialogInterface dialog, int which) {

        // PositiveButto押下時の処理を記述します。

        // 今回はトーストを表示してみます。
        if (result_item == null) {
          result_item = items2[default_num];
        }
        Toast.makeText(P0402DialogEx.this, result_item + "を選択",
            Toast.LENGTH_SHORT).show();
      }
    });

    // 否定的な意味を持つボタンを設定
    ad.setNegativeButton("Cancel", new DialogInterface.OnClickListener() {
      @Override
      public void onClick(DialogInterface dialog, int which) {

        // NegativeButton押下時の処理を記述します。

        // 今回はトーストを表示してみます。
        Toast.makeText(P0402DialogEx.this, "Cancelが押されました。",
            Toast.LENGTH_SHORT).show();
      }
    });

    // ダイアログの表示
    ad.show();
  }

  // //////// チェックボックスダイアログ //////////
  // リストの要素を指定
  private String[] items3 = new String[] { "赤", "青", "黄", "緑" };
  // リスト要素の選択状態(チェック済か否か)を配列指定
  private boolean[] flags = new boolean[] { true, false, false, false };

  String color = null;

  private void showDialog6() {

    // AlertDialog.Builderオブジェクト生成
    AlertDialog.Builder ad = new AlertDialog.Builder(this);

    // タイトル指定
    ad.setTitle("CheckBoxダイアログ");

    // アイコン指定
    ad.setIcon(R.drawable.ic_launcher);

    // 複数選択アイテムのリスト状態を管理
    ad.setMultiChoiceItems(items3, flags,
        new DialogInterface.OnMultiChoiceClickListener() {
          @Override
          public void onClick(DialogInterface dialog, int which,
              boolean isChecked) {
            // タップされた位置(which)のチェック状態を取得
            flags[which] = isChecked;

            Log.i("flags[which]", String.valueOf(flags[which]));
          }
        });

    // 肯定的な意味を持つボタンを設定
    ad.setPositiveButton("Yes", new DialogInterface.OnClickListener() {
      @Override
      public void onClick(DialogInterface dialog, int which) {

        // PositiveButton押下時の処理を記述します。

        // 今回はトーストを表示してみます。
        color = "";
        for (int i = 0; i < items3.length; i++) {
          if (flags[i]) {
            color += (items3[i]);
          }
        }

        Toast.makeText(P0402DialogEx.this, color + "を選択",
            Toast.LENGTH_SHORT).show();
      }
    });

    // 否定的な意味を持つボタンを設定
    ad.setNegativeButton("Cancel", new DialogInterface.OnClickListener() {
      @Override
      public void onClick(DialogInterface dialog, int which) {

        // NegativeButton押下時の処理を記述します。

        // 今回はトーストを表示してみます。
        Toast.makeText(P0402DialogEx.this, "Cancelが押されました。",
            Toast.LENGTH_SHORT).show();
      }
    });

    // ダイアログの表示
    ad.show();
  }

  // //////// エディットテキストのダイアログ //////////
  EditText editText;

  private void showDialog7() {

    // EditText生成
    editText = new EditText(this);

    // AlertDialog.Builderオブジェクト生成
    AlertDialog.Builder ad = new AlertDialog.Builder(this);

    // タイトル指定
    ad.setTitle("EditTextダイアログ");

    // EditTextセット
    ad.setView(editText);

    // アイコン指定
    ad.setIcon(R.drawable.ic_launcher);

    // 肯定的な意味を持つボタンを設定
    ad.setPositiveButton("OK", new DialogInterface.OnClickListener() {
      @Override
      public void onClick(DialogInterface dialog, int which) {

        // PositiveButton押下時の処理を記述します。

        // 今回はトーストを表示してみます。
        Toast.makeText(P0402DialogEx.this,
            editText.getText().toString(), Toast.LENGTH_SHORT)
            .show();
      }
    });

    // 否定的な意味を持つボタンを設定
    ad.setNegativeButton("Cancel", new DialogInterface.OnClickListener() {
      @Override
      public void onClick(DialogInterface dialog, int which) {

        // NegativeButto押下時の処理を記述します。

        // 今回はトーストを表示してみます。
        Toast.makeText(P0402DialogEx.this, "Cancelが押されました。",
            Toast.LENGTH_SHORT).show();
      }
    });

    // ダイアログの表示
    ad.show();
  }

  // //////// プログレスのダイアログ //////////
  ProgressDialog pd;

  private void showDialog8() {

    // ProgressDialog.Builderオブジェクト生成
    pd = new ProgressDialog(this);

    // タイトル指定
    pd.setTitle("Progressダイアログ");

    // メッセージ指定
    pd.setMessage("しばらくお待ちください");

    // アイコン指定
    pd.setIcon(R.drawable.ic_launcher);

    // 進捗率を表示するか否か
    // 「false」にすると進捗率を監視し、表示することが可能になる。
    // 進捗を予測できない場合は、「true」にする。
    pd.setIndeterminate(false);

    // プログレスバーの表示形式の設定
    pd.setProgressStyle(ProgressDialog.STYLE_HORIZONTAL);

    // 表示する分母となる数値の設定
    pd.setMax(100);

    // ProgressDialogを表示中にキャンセル可能か否か
    pd.setCancelable(false);

    // ProgressDialogのキャンセル時によびだされるコールバックの登録
    pd.setOnCancelListener(new DialogInterface.OnCancelListener() {
      @Override
      public void onCancel(DialogInterface dialog) {

      }
    });

    // ダイアログの表示
    pd.show();

    // 進捗率を更新するThread
    new Thread(new Runnable() {
      @Override
      public void run() {
        try {
          for (int i = 0; i < pd.getMax(); i++) {
            // 進捗率を1ずつ更新
            pd.setProgress(i);
            Thread.sleep(100);
          }
        } catch (InterruptedException e) {
          Log.e("ProgressDialog", e.toString());
        }
        // 進捗率100%でダイアログをクローズ
        pd.dismiss();
      }
    }).start();
  }
}