Android -ButtonとImageButton-
ボタンとイメージボタン
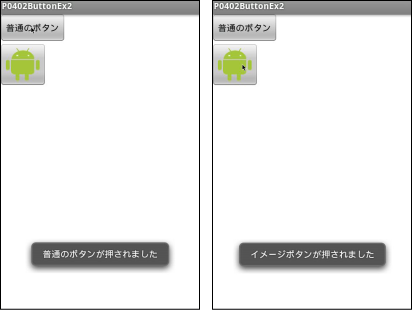
ボタンとイメージボタンを配置し、クリックイベントにトースト表示を行う3種類のサンプルです。
- レイアウトをJavaにて記述する方法
- レイアウトをxmlに記述する方法
- 上記の実行ファイルを無名クラスを利用して記述変更したもの
レイアウトのxmlファイルは、同じものです。
サンプル1(java)
ボタンとイメージボタンのレイアウトをJavaにて記述する方法
イメージファイルが別途必要です。(今回は、droid80.png(80×80)を使用しています。)
resフォルダ内にdrawableフォルダを作成後、ご用意されたイメージファイルを配置して下さい。

P0402ButtonEx.java
import android.app.Activity;
import android.graphics.Bitmap;
import android.graphics.BitmapFactory;
import android.graphics.Color;
import android.os.Bundle;
import android.view.View;
import android.view.View.OnClickListener;
import android.widget.Button;
import android.widget.ImageButton;
import android.widget.LinearLayout;
import android.widget.Toast;

public class P0402ButtonEx extends Activity implements OnClickListener{
  private final static int WC=LinearLayout.LayoutParams.WRAP_CONTENT;
  private Button btn;
  private ImageButton imageBtn;

    @Override
    public void onCreate(Bundle savedInstanceState) {
        super.onCreate(savedInstanceState);

        //レイアウトの生成
        LinearLayout layout =new LinearLayout(this);
        //背景色の指定
        layout.setBackgroundColor(Color.rgb(255, 255, 255));
        //整列方向の指定
        layout.setOrientation(LinearLayout.VERTICAL);
        //表示するビュー(レイアウト)の指定
        setContentView(layout);
        //ボタンの生成
        btn=new Button(this);
        //ボタンに表示する文字列を指定
        btn.setText("普通のボタン");
        //クリックイベントの通知先指定
        btn.setOnClickListener(this);
        //コンポーネントのサイズ指定
        btn.setLayoutParams(new LinearLayout.LayoutParams(WC,WC));
        //レイアウトへのコンポーネントの追加
        layout.addView(btn);
        //イメージの読み込み
        Bitmap bmp=BitmapFactory.decodeResource(getResources(),R.drawable.droid80);
        //イメージボタンの生成
        imageBtn=new ImageButton(this);
        //イメージの指定
        imageBtn.setImageBitmap(bmp);
        //クリックイベントの通知先指定
        imageBtn.setOnClickListener(this);
        //コンポーネントのサイズ指定
        imageBtn.setLayoutParams(new LinearLayout.LayoutParams(WC,WC));
        //レイアウトへのコンポーネントの追加
        layout.addView(imageBtn);
    }

    //ボタン押下時の処理
  @Override
  public void onClick(View view) {
    //普通のボタン押下時のトースト表示
    if(view==btn){
      Toast.makeText(this, "普通のボタンが押されました",Toast.LENGTH_SHORT).show();
    //イメージボタン押下時のトースト表示
    }else if(view == imageBtn){
      Toast.makeText(this, "イメージボタンが押されました",Toast.LENGTH_SHORT).show();
    }
  }
}
トーストとは
トーストは、短時間だけメッセージを表示する機能です。
show()メソッドでの表示が必要です。
- static Toast makeText(Context contex,int reaID,int duration)
- コンテキスト(context)、リソースID(resId)、 表示時間(duration)を指定します。
-
- 表示時間を指定する定数
-
- Toast.LENGTH_SHORT
短時間 - Toast.LENGTH_LONG
少し長め
- Toast.LENGTH_SHORT
- static Toast makeText(Context contex, CharSequenc text,int duration)
- コンテキスト(context)、テキスト(text)、表示時間(duration)を指定します。
サンプル2(xml)
ボタンとイメージボタンのレイアウトをxmlにて記述する方法
イメージファイルが別途必要です。(今回は、droid80.png(80×80)を使用しています。)
resフォルダ内にdrawableフォルダを作成後、ご用意されたイメージファイルを配置して下さい。
res/values/string.xml
<?xml version="1.0" encoding="utf-8"?>
<resources>
    <string name="app_name">P0402ButtonEx2</string>
    <string name="btn_name">普通のボタン</string>
    <string name="robot">Android ロボットくん</string>
</resources>
res/layout/main.xml
<?xml version="1.0" encoding="utf-8"?>
<LinearLayout xmlns:android="http://schemas.android.com/apk/res/android"
    android:layout_width="fill_parent"
    android:layout_height="fill_parent"
    android:orientation="vertical"
    android:background="#ffffff">

  <Button
    android:id="@+id/btn_id"
    android:layout_width="wrap_content"
    android:layout_height="wrap_content"
    android:text="@string/btn_name" />

  <ImageButton
    android:id="@+id/imagebtn_id"
    android:layout_width="wrap_content"
    android:layout_height="wrap_content"
    android:src="@drawable/droid80"
    android:contentDescription="@string/robot"/>
</LinearLayout>
P0402ButtonEx2.java
import android.app.Activity;
import android.os.Bundle;
import android.view.View;
import android.view.View.OnClickListener;
import android.widget.Button;
import android.widget.ImageButton;
import android.widget.Toast;

public class P0402ButtonEx2 extends Activity implements OnClickListener{
    @Override
    public void onCreate(Bundle savedInstanceState) {
        super.onCreate(savedInstanceState);
        setContentView(R.layout.main);

        //ボタンオブジェクトの取得
        Button btn=(Button)findViewById(R.id.btn_id);
        //クリックイベントの通知先指定
        btn.setOnClickListener(this);

        //イメージボタンの取得
        ImageButton imageBtn=(ImageButton)findViewById(R.id.imagebtn_id);
        //クリックイベントの通知先指定
        imageBtn.setOnClickListener(this);
    }

    //ボタンクリック時のイベント処理
  @Override
  public void onClick(View view) {
    //普通のボタン押下時のトースト表示
    if(view.getId()==R.id.btn_id){
      Toast.makeText(this, "普通のボタンが押されました",Toast.LENGTH_SHORT).show();

    //イメージボタン押下時のトースト表示
    }else if(view.getId()==R.id.imagebtn_id){
      Toast.makeText(this, "イメージボタンが押されました",Toast.LENGTH_SHORT).show();
    }
  }
}
サンプル3
サンプル2のView.OnClickListenerを無名クラスで書き換えたものです。
xmlファイルは、同一のものになりますので省略しています。
P0402ButtonEx3.java
import android.app.Activity;
import android.os.Bundle;
import android.view.View;
import android.view.View.OnClickListener;
import android.widget.Button;
import android.widget.ImageButton;
import android.widget.Toast;

public class P0402ButtonEx3 extends Activity {
    @Override
    public void onCreate(Bundle savedInstanceState) {
        super.onCreate(savedInstanceState);
        setContentView(R.layout.main);

        //ボタンオブジェクトの取得
        Button btn=(Button)findViewById(R.id.btn_id);
        //クリックイベントの通知先指定
        btn.setOnClickListener(new OnClickListener() {
      //クリック時のイベント処理
      @Override
      public void onClick(View view) {
        Toast.makeText(P0402ButtonEx3.this, "普通のボタンが押されました",Toast.LENGTH_SHORT).show();
      }
    });
        //イメージボタンの取得
        ImageButton imageBtn=(ImageButton)findViewById(R.id.imagebtn_id);
        imageBtn.setOnClickListener(new OnClickListener() {
          //クリック時のイベント処理
          @Override
      public void onClick(View view) {
        Toast.makeText(P0402ButtonEx3.this, "イメージボタンが押されました",Toast.LENGTH_SHORT).show();

      }
    });
    }
}